Uneven floors can be a major headache, causing issues with flooring installation, furniture placement, and even structural integrity. Whether you’re preparing a surface for tile, hardwood, or polished concrete, achieving a smooth and level base is essential. Fortunately, self-leveling concrete floors offer a convenient solution that homeowners and DIY enthusiasts can tackle with the right preparation and technique.
What Are Self-Leveling Concrete Floors?
Self-leveling concrete is a cementitious mixture that spreads evenly across a surface, creating a flat, smooth, and durable finish. Unlike traditional concrete, which requires manual leveling with tools, self-leveling compounds are designed to flow and settle naturally with minimal effort.
This makes them ideal for correcting uneven surfaces before applying concrete floor polishing, tile, carpet, or other flooring materials.
When Should You Use Self-Leveling Concrete?
Self-leveling concrete is perfect for addressing minor dips, cracks, or uneven areas in floors before installing a final finish. It is commonly used in:
- Residential homes before laying hardwood or tile
- Commercial spaces need a seamless and durable surface
- Garages and basements to prepare for concrete floor polishing
- Industrial settings where a strong, smooth foundation is required
If you notice that your floor has visible depressions, slopes, or imperfections, concrete floor leveling can prevent future complications and ensure a stable surface for your final flooring choice.
Tools and Materials You’ll Need
Before starting your DIY self-leveling concrete floor project, gather the following materials:
- Self-leveling compound (available at home improvement stores)
- Primer for concrete surfaces
- A large mixing bucket
- Drill with a mixing paddle attachment
- Trowel or gauge rake
- Squeegee for spreading
- A long level or straightedge
- Protective gloves and goggles
- Painter’s tape for sectioning off areas
Having the right tools will ensure that the self-leveling compound spreads evenly and sets properly.
Step-by-Step Guide to Applying Self-Leveling Concrete
Below is a guide on how to DIY self-leveling concrete:
Prepare the Surface
Before applying the self-leveling compound, it’s crucial to clean and prep the existing surface. Remove any dust, debris, or old adhesive from the previous flooring. If the floor has cracks or holes, fill them with a patching compound and allow them to dry.
Use a long level to identify the low points in your floor. If the unevenness is extreme, you may need to use additional leveling layers.
Apply Primer
Priming the floor is essential for achieving a strong bond between the self-leveling compound and the existing surface. Use a roller or brush to apply a concrete primer evenly across the floor, ensuring complete coverage. Allow the primer to dry completely, usually for at least 2–3 hours, before proceeding.
Mix the Self-Leveling Compound
Follow the manufacturer’s instructions to mix the self-leveling compound with water. Use a drill with a mixing paddle to ensure the mixture is smooth and free of lumps. The consistency should be similar to pancake batter—fluid enough to spread but thick enough to hold its shape.
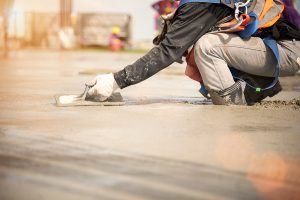
Pour and Spread the Compound
Once mixed, immediately pour the self-leveling compound onto the prepared floor. Start from one corner and work toward the exit, ensuring an even distribution. Use a gauge rake or squeegee to spread the mixture evenly across the surface.
Self-leveling compounds begin to set quickly, so work efficiently. If necessary, pour additional batches to cover the entire floor before the previous layer dries.
Allow the Floor to Cure
After spreading the compound, let it cure according to the manufacturer’s instructions. Most self-leveling products dry within 4–6 hours for light foot traffic, but it’s best to wait at least 24 hours before installing flooring or applying concrete floor polishing treatments.
Common Mistakes to Avoid
While concrete floor leveling can be a DIY-friendly project, mistakes can compromise the final results.
Here are a few common errors and how to avoid them:
Skipping the Primer
Without primer, the self-leveling compound may not bond properly, leading to cracks or peeling.
Incorrect Mixing Ratio
Adding too much or too little water can affect the compound’s consistency and drying time.
Not Working Quickly
Self-leveling concrete sets fast, so make sure to spread it efficiently to prevent uneven patches.
Failing to Check Floor Levels
Use a long level or straight edge before and after applying the compound to ensure an even surface.
Finishing the Floor: Polishing and Sealing
Once the self-leveling concrete floor has dried, you can move on to concrete floor polishing for a sleek, finished look.
Polishing enhances durability, making the floor resistant to stains and wear.
The process involves grinding the surface with finer grits until the desired level of shine is achieved. A sealer can then be applied to protect against moisture and spills.
How Much Does Self-Leveling Concrete Cost?
The cost of self-leveling concrete floors depends on the area size, the type of compound used, and whether you choose additional finishing treatments like concrete floor polishing.
On average, according to HomeAdvisor, self-leveling concrete costs between $1.50 to $5.00 per square foot. While a DIY application saves money, hiring a professional may be necessary for large-scale projects or complex floor conditions.
Is Self-Leveling Concrete Right for Your Project?
If you need a smooth, durable surface before installing flooring or applying a polished finish, self-leveling concrete is a great option. It works well for residential, commercial, and industrial applications, ensuring an even, stable foundation for various flooring types.
It doesn’t matter if you’re preparing for concrete floor polishing or simply leveling an uneven slab; this DIY project can make a significant difference in the final look and function of your space.
Upgrade Your Concrete Floors with Custom Concrete Prep & Polish
For expert help with concrete floor leveling, polishing, and finishing, trust the professionals at Custom Concrete Prep & Polish. Whether you’re tackling a DIY project or need professional-grade results, our team can help you achieve flawless, long-lasting floors.
Get a Free Consultation and let’s bring your flooring project to life!