Can you remove or re-grind a thick self-leveling pour without damaging radiant heat tubing?
Absolutely, but only after confirming the tubing location, depth, and condition. Grinding down an excessive underlayment might be possible with careful work, while aggressive removal may poke a hole through a hydronic line and turn a leveling issue into an extensive plumbing repair job.
The first question is where the radiant tubing is located before removal. Is the tubing built inside the structural slab, directly under the leveling material, or encapsulated inside the self-leveling pour?
Why Does the Tubing Depth Matter So Much?
How much material can be removed before contacting the radiant heating system matters because it affects repair decisions. Knowing that radiant tubing runs several inches below the surface doesn’t carry the same risk as when half the pour sticks up above finished floor elevation.
Radiant tubing gets installed in several ways. Pipes can be secured to slab reinforcement before concrete is poured, fitted inside heating panels mounted over an existing floor, or attached to cable before being covered with cementitious overlay material.
Tubing also has various cover-depth requirements. A Uponor design guide recommends “a minimum of 3/4 inch of concrete cover above the heating tubing.” At the same time, MAPEI mentions “a minimum of 1/2 inch concrete” over some floor warming systems when using cementitious leveling material. Both numbers vary by system and should not be assumed on existing floors.
In our opinion, guessing how thick the self-leveling pour is or where tubing runs starts the job off in failure. Reference plans and installation guidelines help, but physical confirmation is essential.
Can a Thick Self-Leveling Pour Simply Be Ground Down?
Bonded self-leveling material that is too high can sometimes be ground down in multiple controlled passes. A contractor needs to know the target elevation and keep the grinder above the radiant tubing throughout the process.
Custom Concrete Prep & Polish has floor grinding included in our floor leveling for concrete. Some floors need material removed while others need low spots filled before the surface is ready for its new floor covering.
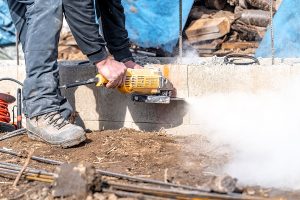
Floor grinding does not involve breaking up the concrete randomly. Handheld or walk-behind grinders remove material from the top down. That is usually better than alternative methods, but it does not make tubing damage-proof.
The grinding process gets riskier when large parts of the floor have very little pour over the existing slab. Going back and forth across an area with varying pour thickness can be a problem.
How Can You Locate Radiant Tubing Before Grinding?
Record the tubing location in as much detail as possible before beginning mechanical removal. Contractors can reference as-built drawings, installation photos, thermal images, scan for tubing with a concrete scanner, and ask the radiant heating installer.
Some methods for locating radiant tubing include:
- Studying available as-built drawings and installation photographs
- Measuring overall pour depth along exposed floor edges or transition areas
- Turning the heating system on for a few minutes and mapping out warmed tubing runs
- Capturing thermal images to record the loop layout
- Scanning the floor for embedded plastic tubing and other objects
- Physically marking the tubing directly on the floor
- Highlighting tubing locations that seem abnormally shallow
- Pressure testing the hydronic system and monitoring for pressure loss
FLIR images show that thermal cameras can help map warm-water tubing locations before grinding. Thermal imaging is not always accurate at determining the distance from tubing to floor surface.
Is Thermal Imaging Enough by Itself?
No. Thermal imaging provides some valuable information, but should not be the only factor in determining how material can be removed safely. Heat symbols may map out tubing position, but cannot quantify how deep installed tubing sits below the surface.
Images may also become unclear when tubing depth is great, the floor covering inhibits heat transfer, or system temperatures are too close to ambient. An image that clearly shows tubing runs in one room may not be as visible in another part of the house.
Using more than one method provides the best results. Spacing information may be on plans, thermal images can define the route, and scanning tools can confirm findings.
Even so, you still need a conservative grinding plan in place. Do not assume any scanning method is 100% accurate or start grinding without further verification.
Should the Radiant System Be Pressure-Tested?
Yes. Pressure-test hydronic tubing before removal activities start. Either the radiant heating contractor or installer should confirm the proper test pressure, but a known starting point will help identify leaks later.
Uponor even advises its installers to pressure-test some systems and keep the pipes pressurized while pouring concrete. Applying that same philosophy to underlayment removal can help monitor for tubing damage during the job. Read the installer’s manual before increasing pressure on any system.
The contractor performing the grinding should not assume pressure guidelines on their own. Age and condition of tubing, manifolds, fittings, boilers, and other equipment can change the recommended test pressure and procedure.
If pressure is lost, it may be time to stop. Grinding across an unseen puncture can enlarge a hole or make an eventual repair more difficult.
Which Removal Methods Create the Most Risk?
Heavy demolition usually has greater potential to damage radiant tubing than shallow grinding with proper verification. Chipping guns, scarifiers, saws, and large milling machines dig into underlayment faster than most people can react to plastic tubing.
Planetary concrete grinders can mill away coatings, underlayments, and structural concrete using different tools and grinding passes. Dense concrete takes more aggressive diamonds while soft material can be removed quickly with the proper polishing tool.
That does not mean every floor should be ground down. Grinding might be too slow, costly, and dangerous if tubing runs too high.
Custom Concrete Prep & Polish takes time to evaluate the entire floor before deciding if grinding, scarifying, patching, or something else is needed. We offer several surface preparations that involve mechanical removal and profiling for levelling materials.
What If the Self-Leveling Material Is Loose or Hollow?
Self-leveling material that does not bond to the underlying floor should normally be removed. Adding more material on top of an area that detached or failed once might cause the same thing to happen a second time.
Walking across the floor and listening for hollow-sounding areas can help identify other potentially weak areas. Failed sections may run farther than the visible damage indicates.
Contractors at Custom Concrete Prep & Polish note that loose leveling material may require grinding, scraping, or other forms of mechanical removal. They also explain the need to fix what caused the initial problem. That could be poor substrate preparation, moisture issues, primer selection, soft concrete, substrate shrinkage, or something else.
The challenge is that most removal methods follow the weakness. If tubing installed under a self-leveling overlay that then delaminates or falls off, grinding too much material away may damage or expose tubing.
Can You Remove Only Part of the Pour?
Maybe. Leaving material in place can be acceptable when high spots, ridges, transitions, or small failed sections are the problem. Three rules apply after deciding to patch:
1. Ensure remaining material is well bonded to the floor.
2. Ensure repair material is compatible with the base slab.
3. Confirm the finished flooring can be installed on top.
Decent self-leveling material usually needs to be ground down or blended into the existing floor before patching. That creates a smooth transition rather than a noticeable step between the repaired section and the rest of the floor.
While polymer-modified patching material is not considered a leveling product by most contractors, it could be the better choice when repairing small dips or spots. Self-leveling products tend to flow out quickly, which makes controlling where material stops difficult.
What Happens After the Old Material Is Removed?
Once a floor is prepped for leveling, it needs to be scanned again for flatness issues, debonded material, free moisture on the surface, cracks, and damage caused during removal. Substrate preparation for the next flooring system will differ if ceramic tile, luxury vinyl plank, wood flooring, carpet, coatings, or another leveling material is planned.
Leveling might be an option after the floor is swept for dust, prepared with the correct level of mechanical profiling, and primed. Any self-leveling material also needs to be covered under the manufacturer’s radial heat guidelines.
Custom Concrete Prep & Polish generally turns radiant heat systems off at least 48 hours before applying most primers and self-leveling underlayments. MAPEI also instructs contractors to wait until after installations complete before powering any radiant heat system back on. Wait times may vary by manufacturer.
Always follow the radiant heating manufacturer’s instructions for heating shutoff, restart, and use during installations. Product specifications from Custom Concrete Prep & Polish include options for self-leveling and broadcast texture toppings. Many variables affect product recommendations.
What If Safe Removal Is Not Practical?
Sometimes removing underlayment material is not an option. When tubing lies too high or required removal is excessive, repairing in place might be the safer solution. Localized grinding, incorporating transitions, installing an overlay, or changing the finished flooring might work.
In some cases, the radiant tubing needs repair or replacement before anyone can install a new floor. Discuss options with the owner, flooring contractor, heating contractor, and engineer when the floor structure is involved.
Preserve what tubing does not get cut or accidentally punctured by making the right decision. An acceptable plan will review removal cost/risk vs other available options.
How Is Dust Controlled During Underlayment Grinding?
Cementitious materials contain crystalline silica, which can cause lung disease when inhaled. Engineering controls, dust containment, and thorough cleanup should always be used when grinding concrete or leveling materials.
OSHA mentions using wet methods or vacuum dust-collection systems when operating walk-behind floor grinding equipment. Failure to control dust can make installed tubing vulnerable to dry sweeping, which increases silica exposure. Vacuum systems with HEPA filtration are a suggested alternative.
The dust control plan should also protect nearby equipment, occupied rooms, and the radiant heating manifold. Plan equipment access, breathing air, disposal, and other contractors before starting.
Can you remove or re-grind a thick self-leveling pour without damaging radiant heat tubing? Sometimes. Only after locating tubing, measuring material thickness, and determining how to safely remove excess material. Contact Custom Concrete Prep & Polish to discuss how we evaluate floor conditions and decide between grinding, partial removal, patching, or alternative leveling methods.
Can You Remove or Re-Grind a Thick Self-Leveling Pour Without Damaging Radiant Heat Tubing?
Sometimes, but only after you confirm the tubing location, depth, and condition. Controlled surface grinding may be practical when enough solid material remains above the tubing, while aggressive removal can puncture a hydronic line and turn a floor-leveling problem into a major plumbing repair.
The first question isn’t how quickly you can remove the underlayment. It is whether the radiant tubing sits inside the structural slab, directly below the self-leveling material, or inside the pour itself.
Why Does the Tubing Depth Matter So Much?
Tubing depth determines how much material you can remove before the grinder reaches the radiant heating system. A floor with tubing several inches below the surface presents a different risk than an overpour with tubing close to the finished elevation.
Radiant systems are built in several ways. Tubing may be tied to reinforcement and embedded in a concrete slab, installed in panels above an existing subfloor, or encapsulated in a cementitious overpour.
Manufacturer requirements also vary. One Uponor design guide calls for at least 3/4 inch of concrete above the tubing in that particular radiant slab assembly, while MAPEI describes a minimum of 1/2 inch above some floor-warming systems when using cementitious self-leveling material. Those figures are system-specific and should never be treated as proof of the actual cover on an existing floor.
From our perspective, assumptions are where the risk begins. The original plans and product instructions are useful, but field verification still matters.
Can a Thick Self-Leveling Pour Simply Be Ground Down?
A thick, bonded self-leveling pour may sometimes be ground down in controlled passes. The contractor must know the target elevation and maintain a safe margin above every radiant loop.
Custom Concrete Prep & Polish uses mechanical grinding as part of its concrete floor-leveling services. Depending on the project, floor preparation may include removing high areas, filling low areas, and bringing the surface within the specifications of the new flooring.
A floor grinder removes material from the top down. That provides more control than breaking the floor apart randomly, but it does not make the tubing immune to damage.
The risk increases when the pour thickness changes across the room. A floor may have an inch of material in one low area and only a thin layer over a nearby high point.
How Can You Locate Radiant Tubing Before Grinding?
Map radiant tubing as accurately as practical before mechanical removal begins. Contractors may use construction drawings, installation photographs, thermal imaging, specialized concrete scanners, and information from the radiant-heating installer.
A practical evaluation may include:
- Reviewing as-built plans and installation photographs
- Measuring the pour depth at exposed edges or transitions
- Operating the heating system briefly to map warm tubing paths
- Using thermal imaging to document the loop pattern
- Scanning the floor for embedded plastic pipes and other objects
- Marking tubing paths directly on the floor
- Identifying areas where the tubing appears unusually shallow
- Pressure-testing the hydronic system before work begins
FLIR documentation shows that thermal imaging can reveal the path of warm-water tubing beneath a floor. Thermal imaging helps map the pattern, but it generally does not provide a dependable measurement of the amount of cementitious material covering the tubing.
Hilti identifies locating underfloor heating pipes as an application for its concrete scanning equipment. Its scanning systems can also detect plastic pipes and other embedded objects, although detection depth and accuracy depend on the scanner, floor materials, moisture, and site conditions.
Is Thermal Imaging Enough by Itself?
No, thermal imaging should not be the only source of information when you plan substantial grinding or removal. It may show where the warm tubing runs, but not exactly how far below the surface it sits.
The image can also become less distinct when the tubing is deep, the floor covering slows heat transfer, or the system has not created enough temperature contrast. A loop pattern that appears clear in one room may be harder to follow in another.
Combining methods provides a better picture. Plans may show spacing, thermal imaging may show the route, and scanning equipment may help confirm location and depth.
Even then, use a conservative removal plan. No scanning method should be treated as permission to grind aggressively without checking the floor as work progresses.
Should the Radiant System Be Pressure-Tested?
Yes, a hydronic system should generally be checked before removal work begins, with the radiant contractor or plumber determining the appropriate testing procedure. A documented baseline can help identify whether pressure was lost during floor preparation.
Uponor instructs installers to pressure-test certain radiant systems and keep the piping under pressure while pouring concrete. Applying that same principle to remediation is a practical way to monitor system integrity while work occurs, although the original tubing manufacturer’s requirements should control the test pressure and procedure.
The contractor performing the grinding should not guess at the appropriate pressure. Older tubing, manifolds, fittings, boilers, and controls may require different procedures.
If pressure drops, stop work until the cause is identified. Continuing to remove material could enlarge a small puncture or make the eventual repair more difficult.
Which Removal Methods Create the Most Risk?
Aggressive demolition generally creates more risk than shallow, measured grinding. Chipping hammers, scarifiers, saws, and heavy milling equipment can penetrate material quickly and may provide little warning before reaching a tube.
Planetary floor grinders can remove coatings, underlayments, and concrete using successive passes and selected tooling. The material’s hardness and thickness determine the appropriate diamonds and removal rate.
That does not mean a grinder is always the right tool. If you must remove several inches, grinding may be inefficient, expensive, and too risky near shallow tubing.
Custom Concrete Prep & Polish evaluates whether grinding, scarifying, patching, or another preparation method fits the slab and the finished flooring. Its surface-preparation services include mechanical removal and profiling for leveling materials, coatings, and other flooring systems.
What If the Self-Leveling Material Is Loose or Hollow?
Normally, remove loose or delaminated underlayment until the contractor reaches stable, well-bonded material. Pouring another layer over a failed section leaves the new system dependent on the same weak bond underneath.
A tapping survey can help locate hollow-sounding sections beyond the visible damage. The edges of the failed area may extend farther than the crack, chip, or raised section suggests.
Custom Concrete Prep & Polish explains that loose leveling material may need to be ground, scraped, or mechanically removed before a repair is installed. Its guide to repairing a chipped or failing leveling layer also emphasizes correcting the cause, which may involve poor preparation, moisture, incorrect primer, weak concrete, or substrate movement.
The complication is that removal depth follows the failure. If the underlayment has separated near the radiant tubes, complete removal may not be practical without exposing or damaging the system.
Can You Remove Only Part of the Pour?
Yes, partial removal may be appropriate when the problem is limited to a high area, ridge, transition, or isolated failed section. The remaining material must be sound, compatible with the repair, and able to support the planned flooring.
Repair edges usually need to be blended rather than left as abrupt steps. You may then use a compatible patching product to correct shallow areas.
Self-leveling products are not always the right choice for small repairs. Custom Concrete Prep & Polish notes that polymer-modified patching materials may be more appropriate for shallow depressions, chips, or feather-edge corrections. The repair depth and product instructions should determine the material.
What Happens After the Old Material Is Removed?
After removal, check the floor for flatness, remaining bond issues, moisture, cracks, and damage to the radiant system. The final preparation method depends on the next surface: tile, luxury vinyl plank, hardwood, carpet, a coating, or another cementitious topping.
A new self-leveling pour may be possible after the substrate is cleaned, mechanically prepared, and primed. The selected product must be approved for use with radiant heat and installed at the required thickness.
Manage radiant heat during the new installation. MAPEI directs installers to turn off radiant-heat systems at least 48 hours before applying its primers and self-leveling underlayments and to keep the system off during installation. The selected underlayment manufacturer should provide the exact shutdown and restart schedule.
The product specifications used by Custom Concrete Prep & Polish include self-leveling and architectural topping options for different applications. Product selection depends on the substrate, depth, radiant system, intended covering, and jobsite conditions.
What If Safe Removal Is Not Practical?
If the tubing is too shallow or the required removal is too deep, the safest solution may be to leave sound material in place. Instead, the floor might be corrected with localized grinding, transitions, a compatible topping, or changes to the finished flooring plan.
In some cases, the radiant system may need to be abandoned, repaired, or replaced before rebuilding the floor. That decision should involve the owner, flooring contractor, radiant-heating professional, and engineer when structural concerns are present.
There is no value in saving the underlayment removal budget only to puncture several heating loops. A realistic proposal should compare the cost and risk of removal with the alternatives.
How Is Dust Controlled During Underlayment Grinding?
Grinding cementitious underlayment and concrete can release respirable crystalline silica. Professional removal work should use appropriate engineering controls, containment, and cleanup procedures.
OSHA identifies wet methods or vacuum dust-collection systems as control options for walk-behind floor grinders. Its standards also restrict dry sweeping, which can increase silica exposure, and recommend methods such as HEPA-filtered vacuuming.
Dust control also protects mechanical equipment, occupied areas, and the radiant-system manifold. The preparation plan should account for access, ventilation, electrical power, disposal, and other trades working nearby.
Can You Remove or Re-Grind a Thick Self-Leveling Pour Without Damaging Radiant Heat Tubing?
Can You Remove or Re-Grind a Thick Self-Leveling Pour Without Damaging Radiant Heat Tubing? Yes, in some situations, but you must map the tubing, measure the pour thickness, and control the removal method. Contact Custom Concrete Prep & Polish at (303) 222-2147 to review the floor conditions and determine whether grinding, partial removal, patching, or another leveling solution is the appropriate fit.